Friday, July 1, 2011

Indoor Gymnastics Photography


click to view larger


This post was written in 2011 on an old blog platform; I have repeated it here so it can live on  , , 


These photos are taken at the USA Sports Winter Spectacular. Flash photography is not allowed as this distracts and endangers the athletes. Flash is a no-no in these competitions as it will distract the athletes and can  cause serious injury.  


There photos are taken without flash, using a very fast 85mm or 50mm f1.4 lense at 1600 to 3200 ISO at 1/500sec to 1/1000sec on a Nikon D700.  Speed in the lens is very important.  ("speed" is the ability of a lens to open to a very wide aperture.)  Even the fast and expensive f2.8 telephoto zoom lenses will struggle to perform well in this lighting; remember f1.4 is 2 stops, or double-double the amount of light as f2.8..  Slower f3.5 lens will have a difficult time working in this dim lighting.  


Full frame DLSR with lower (10mb to 16mb) resolution tend to handle higher ISO with less noise than crop frame or mega-pixel monster bodies with 24+ mp.  Simple reason is pixel size on the sensor; the smaller pixels found on higher resolution sensor have more trouble getting rid of heat, and heat equals noise.  Technology is changing all the time, and new (and expensive) bodies are being produced that have both very high pixel count resolution.  


Spot or center focus tends to work best or you might find your camera focusing and metering on the back wall or crowd while following these fast routines. I shoot in bursts as fast as the camera will allow.  Color balance and exposure is always an issue with Gym lighting.  Shooting in raw, presetting color balance and pre-shooting grey cards helps.


The good news is that new, less expensive "consumer" mid-mp cameras in the 16mb range are being produced that handle high ISO very well and take fantastic images.  "Consumer" means less expensive (typically under $1,000,) not cheap!  Professional bodies (typically $3,000 and up) are made tougher and heavier, and are geared towards full time photographers who want full control over the camera with minimal "auto" settings.  Don't lug one of these rocks around unless you need this type of manual control, the current "consumer" cameras are fantastic! 


All the tech stuff is great, but it helps to know the gymnast routines and get to the best spot possible to shoot.  As the “official” photographer at his particular event I was able to move about the periphery of the floor to take photos.  I never place myself where I block the parents view; these shows are for family to see these gymnasts. I do mange to bang my head on equipment as I move quickly around the gym, , , ,


Please visit my web page at Steve Loos Photography
hint; right click; new tab or window

Friday, May 27, 2011

Blue Light Photography

Vets Hall, Hollister California
This image was taken for the San Benito County Chamber of Commerce for use in web and print media. I had seen many beautiful examples of "blue light" photography and conceptualized this image while looking at those beautiful evening light photographs.

Of course the weather decided not to cooperate, and with a deadline looming I was watching the sky every evening for several weeks. Finally one evening the sky to a deep crystal blue color with a few wispy white clouds. At the time I was sitting on my back deck and well into a bottle of red wine and a fine cigar when I looked up and saw these conditions forming. I apologized to my friends, grabbed a camera and tripod and off I went.

The challenge of photographing buildings is that in photographs they look like, well, buildings. There are many types of architectural photographs that catch my eye; close up detail shots, perspective shots taken from far away with a long lens, close up shots taken with a fancy tilt/shift lens. I learned of these “blue light” shots several years ago when I was taking a lot of real estate photos. The trick is to catch the light at some balancing point between the light on your subject and the light in the sky. For several minutes the light coming off your building subject will balance with the soft light of evening. And, if the sky is cloud free with no haze you will see this soft blue light just before dark.

Its best to frame your shot early, just as evening begins and then take a few shots every 3 to 5 minutes and to check the lighting.  The sky will move from being over exposed to balancing with the landscape. I set exposure by watching the histogram and the highlights for “blinkies.” 

I shot several images on the D700, 17-35mm f2.8, ISO400 at f8 and 17mm, trying ¼ to 2 second exposures.  The 1 second exposure came out the best and was used for single image processing.  I also shot several 1 stop bracket series adjusting exposure only.  I plugged these into Photomatrix Pro and used exposure fusion.  I ended up enjoying the single exposure best (I usually do over HDR) but both single and blended images were acceptable.  Post processing was performed in Photoshop CS6 and Nik Viveza for color, contract and selective exposure, then Nik Define for noise and Nik Sharpen.  A 1:2 crop was applied to the final image. 

Monday, April 18, 2011

Lazy Hazy Dazy


(click to view)

Lazy Hazy Dazy, originally uploaded by Steve Loos.

View east looking into Panoche Valley from a ridge in the Diablo Range off of Panoche Road; the historic New Idria Mine and Clear Creek are located in the distant hills.  This was a very windy and hazy afternoon and I was not in this area looking for a landscape image.   I was working my way up a ridge looking for birds, but the wind had most birds tucked well into trees. 

As I was shooting I noticed the light and shadows painting interesting patterns on the hills, and the sunlight was mixing with the haze and forming interesting layers of the ridge lines that ran to the horizon.  The hazy scene was very relaxing and pleasant to view, and I was wondering if I could capture an image that allowed the viewer to enjoy this relaxing, hazy, sunlit view. 

I framed up this image using a 70-200 f2.8 VR at around 135mm and liked the frame.  This is a very “front to back” image, in that the ridge lines that run into the distance provide an important depth to the image.  I shot this with a wide angle lens and the look was dramatic but the wide shot highlighted the valley and not the light and shadows in the distance. 

In post process I moved this image into black and white using Nik Silver Efex and added a bit of sharpness as well as enhancing the blue tones a bit; the black and white process removed a color cast caused by the haze, but the color version was pleasant also.

I learned a few lessons here.  My first assumption when viewing this hazy scene is that a landscape image would not be very appealing.  Only after sitting and enjoying the view did I realize the interplay between the haze, light and shadows was creating a really cool affect on the hills in the distance.  Also the urge to grab a wide angle lens on this vista was strong, but the wide shot distracted the eye from the really nice parts of this view, namely the light and shadows in the distance.  So, don’t be afraid to try a shot on a hazy daytime scene, and be creative with the lens in your bag.  Don’t limit yourself to the wide angle lens when viewing wide angle vistas; sometimes beauty is in the small details even when viewing huge expansive views.  

Also I was shooting in full manual mode and made sure the highlights in the clouds were not over exposed.  I did not use a split grad filter as the shadows in the hills contain enough detail to be interesting, and I prefer the dramatic difference between the bright cloud and dark shadow.  Graduated filters and HDR processing are great tools for handing huge differences between light and shadow in the frame, but consider leaving most of the shadow in place if it is part of the view.  Sometimes letting the shadows fall to a black silhouette can be a dramatic affect.

Saturday, March 26, 2011

Storm over Gablians


Storm over Gablians, originally uploaded by Steve Loos.

This photo was taken last week during one of our many storms.  I walked up the hill behind my home and shot this image looking east towards a spectacular thunderstorm.  The shafts of rain and sun under the cloud were mesmerizing, and I’d hoped the photo did the view honor.

I did not use a grad filter and often do not on these storms as I like the dark, ominous feeling under the clouds.  If I can capture event a little detail beneath the cloud without over exposing the cloud tops I usually don’t use a grad filter.  In this image the sun was off my right shoulder and much of the rain beneath the cloud was in sunlight ~ a lucky combination that allowed the camera to capture detail in shadows and rain beneath the cloud without over exposing the white tops of the storm.

This image was shot in raw and use Adobe Camera Raw to post process for color and contrast; no HDR or double process was used.  Mid-tone contrast was enhanced by balancing fill, blacks, brightness and exposure in ACR; a combination of levels and curves can achieve similar results in JPG process in Photoshop (most process software can adjust levels and curves, or look for shadow/midtone/highlight adjustments.)  Try adjusting mid tones before working on shadows and highlights and pay attention to clipping (blowing out highlights and driving shadows to pure black.) 

Then the photo was loaded into Nik Software Silver Efex; a great program for converting photos to black and white.  I played with various settings, and ended up enhancing contrast and adding the “selenia” overlay which gave the image the blue / metallic feel. 

Tuesday, March 22, 2011

take off; white tail kite


take off, originally uploaded by Steve Loos.
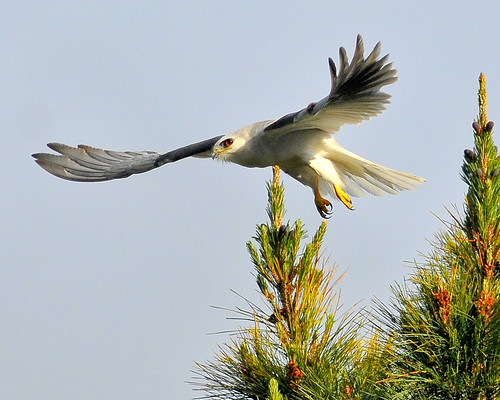
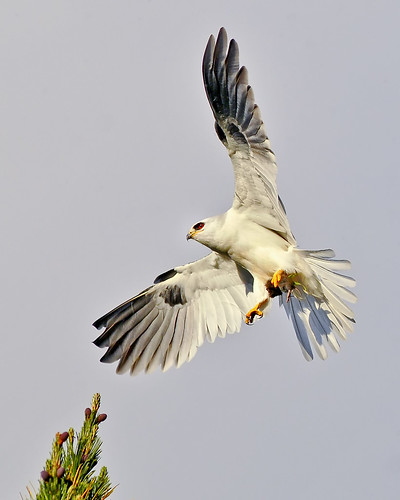
Another shot of my family of White Tail Kites living in my backyard in Hollister California (see previous post for another shot.) These birds setup their nets way at the top of an old pine in my backyard, and the nest is invisible from the ground. I can tell when Mom is in the nest as I hear her screeching and chirping at any bird that gets to close! This is a shot of the Male; he seems to be a happy fellow and loves to harass he crows that also hang out in the in the pines.

Michael Garvin made a great comment on the previous photo, that the tree branches in the frame give the photo depth of field. This is a great point. My favorite flying bird images have a tree or soft background somewhere in the frame. This gives the image some depth and scale; my eye gets lost looking at an image of a bird flying against a featureless sky.  Also the best time for me to photograph birds is at first light in the morning or at sunset; this puts the suns angle very low so the undersides of the wing and body have beautiful soft light.

How did I take this photo?

A few folks asked about the equipment and settings I use to take bird photos.  I started out to write a short simple answer.  Instead I wrote a long answer with simple advice; I hope it is useful.

My best advice

Know your equipment!  Spend time reading the user manual and visiting blogs that discuss your camera.  DPreview.com and kenrockwell.com are two popular sites.  I have missed out on great shots because I forgot how to quickly setup or change a setting on my camera. 

Go to bird and wildlife photographers websites and blogs.  Pay attention to the camera settings and time of day, and read about how they took the image; this is far more important that the equipment!  Quit a fiew "consumer level DSLR cameras" (i.e. cameras that cost less than your first car) are capable of great wildlife photos.   If you read enough you will see that many great images are taken with non-professional equipment by photographers who have mastered the equipment they use. 

Many photographers spend thousands of dollars on the newest and greatest gear, or the "professional" grade equipment and still get poor results.  Do not use dollars to chase image quality!  

When shooting birds or other wildlife do not rely on any auto setting in your camera.  Do not use the "P" program mode, or any of the presets including "wildlife" or "pets." These settings can be great in many situations, but when shooting wildlife the chances at a good image come and go so quickly you don't want to leave that chance up to the camera.  The auto settings are asking the camera to make all the decisions about lighting, exposure, focus, shutter speed, aperture and ISO.  When the "auto" photos are not coming out as expected it is often difficult to decide what settings to change as you don't always know what the camera is doing! 

Go outside and practice on leafs, pine cones, chimneys, fence posts, squirrels, bugs, kids (go shoot kids at a soccer game ~ you will learn a lot of good stuff!)   Practice on all the common birds and wildlife in your yard,  even your dog and cat; I have captured some great bird images while practicing. 

I can't stress this enough.  Most chances to capture good wildlife images come in 15 second blocks of time out of hours of waiting.  You will ruin your enjoyment if you miss these shots due to not knowing your equipment and techniques.  Being able to adjust your camera quickly to match a certain situation is a must have skill! 

Equipment

I prefer small sensor cameras as these provide higher effective focal length while maintaining resolution; this was taken with a D300 which has a 1.5x crop sensor that makes a 300mm lens will be similar to a 450mm lens on a full frame camera.  This helps a lot on bird images but you still have to be close; I was less than 150’ from the bird at most times and still had to crop 25% to 50%.  

I used a 300mm f2.8 lens. This lens is “fast” in that it lets in a lot of light allowing for faster shutter speeds; fast shutter speeds are a must with birds and sports.  An f2.8 lens is twice as "fast" as a f4 lens in that the f2.8 lens can let in twice as much light as an f4 lens.  Does this matter if both lens are shot at f5.6?  Maybe; many lenses have a sweet spot one or two f stops higher than the widest aperture; the f2.8 may be a lot sharper at f5.6 than the f4.   Also I can keep shooting in low morning and evening light, my favorite times to shoot wildlife.  Another popular lens is the 400mm f4; slower so must be used in good light for fast shutter speeds but I have seen many beautiful wildlife and landscape images taken with this lens.  

The 300 f2.8 is a "prime" lens as a opposed to a "zoom" lens.  A 70-200mm f2.8 is a "zoom" lens as opposed to a "prime" lens.  I find the images that come from prime lens sharper with better detail and color; this is due to lens design.  A zoom lens has more moving parts and more glass in order to make the lens zoom and this can compromise image quality.  There are some great zoom lens in the market and these can be a better value for many people as they are far more versatile than prime lens; if you have a 300mm lens on your camera and you want to shoot a wide landscape, you'll need another lense.   

Keep in mind the longer the lens (a 400mm lens is "longer" than a 200mm lens and has more magnification) the higher the shutter speed required for a sharp image, especially handheld.  Also, the new vibration reduction ("VR") lenses will not help shooting fast moving objects.  The VR is useful for low light hand held photography of slow moving or stationary objects.  When chasing fast moving objects sometimes the VR must be turned off; "VR" is not a useful feature for sports or bird photography. 


Monday, March 21, 2011

dinner; white tailed kite


dinner, originally uploaded by Steve Loos.
I live in San Benito County on California’s central coast. Located along the Pacific Flyway reaching from Alaska to South America our area sees an incredible array of bird life each season. This fellow however is a year round native; a male White-Tailed Kite. These falcon-like birds were nearly extinct in California due to egg hunting, but are now well established in some areas.

These birds are common residents along grassy hillsides, and are easy to spot as they often “kite” or flutter their large white wings in a hovering motion, waiting to pounce on prey. I had not seen too many near my home, but this year this pair has setup housekeeping at the very top of a an old pine in my backyard. In addition to the regular crows, mockingbirds, doves, red tail hawks, finch, hummingbirds (little green guys - don't know the name,) and western woodpecker, these trees are home to migrating ring neck pigeons and now a pair of kites.

I only noticed them the other day, and this evening the setting sun was mixed with clouds and rain, throwing a soft warm light across the sky. Mom was in the nest, and in between harassing the local crows dad was out hunting. I noticed dad on his way back with one leg tucked up under his body and assumed he had a meal; turns out it was a nice fat mouse or gopher; he even had a few blades of grass included.

I used a D300 and 300mm f2.8 lense, bumped the ISO up a bit to keep shutter speeds fast, and set aperture priority at f5~f5.6; this gave me a decent depth of field and 1/1000sec+ shutter speeds. The D300 has a nice feature; center weight focus with object tracking. As long as I put the focus point on the subject before half-depressing the shutter, the camera will track that subject all around the frame and maintain focus. This is a great feature when trying to track birds or airplanes against a featureless sky; if focus is lost the lense will wander well out of focus and recovery to focus takes far too long.

Saturday, February 5, 2011

3 against 1


3 against 1, originally uploaded by Steve Loos.

Postcards from San Benito County!
Thank you to the staff at the Chamber of Commerce for honoring me with a request to create postcards that highlight the beautiful and unique place that is San Benito County. What a better place to start than a photo of wild broncs and the cowboys at the historic Saddle Horse Show and Rodeo!

 Visit the San Benito County Chamber of Commerce
 650 San Benito Street, 831-637-5315

 www.sanbenitocountychamber.com

Tuesday, February 1, 2011

10 miles with a flag


10 miles with a flag, originally uploaded by Steve Loos.

Runner made 10 miles carrying American Flag. US Marine Corps banner on top says it all. Hoo-Rah!

Saturday, January 15, 2011

Honesty in Photography


click to view larger:


his post was originally written in 2011 on an old blog platform.  I have moved it here so it can live on in a new home.

In 2011 there was (maybe still is?) a great discussion in G Dan Mitchell's photography blog;  the topic was "is it real?"  The conversation had been blog-bouncing for over a month and talks about when a photograph is real, or when it has been Photoshop-ed into something that is no longer a photograph. I was curious if it is not a photograph, what else can it be?  Here is the link to Dan's blog topic:  

I was so enthralled with this discussion that I compelled to blow off an entire nights sleep to write a short article on the “art vs. photography” debate (link:
http://steveloosphotography.blogspot.com/p/is-it-life-art-or-photoshop-journey-to.html

Months after these posts, the discussion goes on (and will forever, I hope!)  This is a follow up reply to that discussion.

Thanks for a great topic Dan!

Steve Loos

(my reply)

Honesty in discussing the image is important.  Certainly as you both point out, if you make a composite image then somewhere in the footnotes of that image this should be discussed.  Landscape Pros struggle with this all the time.  Sign posts, power lines, stray people and ugly cows (well maybe not the cows) are doctored out of an image if the landscape photographer can’t first change their perspective.  Should this be discussed in the image?  I don’t know many who believe these items contributed to the image and therefore are not important enough to the image to discuss.  How about those composites, bracketing and HDR?  Should the landscape photographer disclose that this was composite (even if a single image double processed?)  Most folks I follow do indeed believe that important elements of the image were changed, and they do discuss these changes. So here the community seems to have found a somewhat clear boundary.  And, clear boundaries are scarce in discussions of art. 

Humans need boundaries (rules, structure, whatever)! These “art versus photograph” conversations arise then we humans attempt to apply rules to art.  Attend a class on “the rule of thirds” and you will learn a lot of great information on composition.  But, try and apply those rules to the photographs you view, and soon you will be staring in awe at a beautiful DuChemin image with the subject and horizon neatly splitting the image in half, both vertically and horizontally (see http://www.pixelatedimage.com/blog/2011/01/dont-break-the-rules/, January 2011.)  Read this and you’ll wonder if you wasted time learning rules.   

Rules serve to teach artists the basics ~ and well beyond the basis; they also help photographers struggling to frame an image just as they help a painter fill his canvas.  But these rules work best when they are applied (and broken) looking out through the viewfinder, not while looking back at the final image.  Here is an absolute for you; not every piece of art will satisfy everyone who views it.  And, some of those who do not feel satisfied with a photograph will try and reverse-engineer the “rules” of art to explain why they don’t like the image.   It’s just my opinion, but these rules don’t work that way. 

Great discussion!

Steve Loos